
Welcome to the dress diary of my entry for the Foundations Revealed contest 2019: the Catherine Corset.
For this year’s theme I looked for an architectural element that had an intrinsic link with corsetry. I found this link in the curves of the onion domes of Russian cathedrals.
I wanted to reflect the domes through the fabrics, shape and form of the corset. But more than a mere mimicry of the architectural form, the corset incorporates the strength and rulership of Catharine the Great. Through trial and error I explored the ballance between idea and realisation.
Although I tried to make this journal into a logical, step-by-step log, in reality steps were mixed up, retaken and improvised along the way.
Without further ado, I'm very proud to present to you the making of my Catherine Corset.
My second attempt consisted of much less pattern pieces and the mock-up seemed to work well on the mannequin. However, when I finally got to fit the piece, I realised that many things were not right yet: the white lines were quite off, the waist reduction was gone and I had completely miscalculated where the cups were supposed to stand.


After adjusting upper torso and cup position, I made a third, this time completely orange and busk-less mock-up. Since I would not have the time to make a fourth mock-up, I simulated the white parts with pattern paper - this way I could easily adjust them to a more esthetic shape. When I was finally happy with the basic shape, I transfered the shapes to a paper pattern. Since I was planning to work in two layers, I made two sets of patterns: one for the golden shell consisting of nine pattern pieces and one more simplified set for the inner strength layer.


Originally, I wanted to create the cups from scratch, with custom padding and everything. But since this proved more time consuming than foreseen and the contest-clock was ticking, I had to make some compromises. And since by this time I already decided to cover the cup with smocked fabric (see further), I ended up cutting up an existing bra.


INTERMISSION: PUFFED CORSET
Before I started with the construction of the corset I wanted to test out a little idea I had come up with during research. The onion domes of Saint Basil's in Moscow had gotten me fascinated with how each "slice" of the onion seemed to be tucked inward (especially on the white with blue dome). Planning to mimic this shape, I was going to add wadding to side hips and front ribs, and sew down each seam by hand,so a slight "puffed" effect would be reached. After several tests, it became clear to me that the fabric would ripple too much and also distort the subtle curved shapes I was able to create with my pattern. Maybe this idea will get a place in another project one day.


CONSTRUCTION (PART 1)
Although I had let go of my idea with the wadding, I still had certain specific requirements for the construction. Most importantly, I did not want ANY stitchings in the gold fabric. Since my prefered way of construction (one layer, often involving fusing), would mean visible stitches, I had to adept to this goal.
 What I came up with, was a two layered corset: an outer shell of gold and pearl white and a inner coutil corset, with double boning channels touching the body, to prevent any markings through the gold. Each seam of the outer layer would be handsewn on the underlayer to prevent rippling and provide for a clean, smooth finish. Since the outside shell consisted out of more and other seams than the inside layer, I provided the inside layer of markings where each outside seam was going to come, as a guideline where to sew down each seam. But with the turn-of-cloth in mind, I also realised that I would have to bend and hold the corset in the right shape when sewing down. As the stretchy golden layer would stay unfused, I was sure the stretch would also help for a smooth "wrap" around the inner corset. I could not have been more wrong (see below).
 First step was to make a seperate piece for the busk (it would get sandwiched between both layers): the pearl white was fused to a sturdy cotton and the middle seam allowances were, not being able to iron this seam, "pressed" open using textile glue.
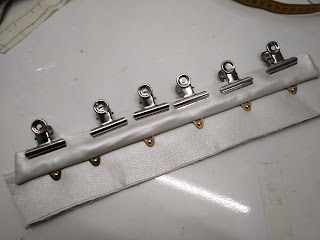
The inner layer was completely assembled, boning was added and steamed into shape; followed by the outer layer (of course here no ironing). Since opening the golden seam allowances with textile glue did not look so good (see picture), I left them unopened, until I was going to sew them down. The piping on the white parts was improvised, I added them because the white parts seemed otherwise too empty. I also added a piping strip to the curved edge under the cup, as it would make a neat finishing detail. After assembling both layers, I attached them to the busk (sandwich-method-wise).


SMOCK
For this corset, I wanted to add something that would refer to my existing portfolio. I had been working with smocking technique on some projects already and I really enjoyed creating it. Smocking the golden leather would not only create a beautiful play of light, it would also add an interesting contrast to the smooth parts of the corset. At first I thought of making a flower smock, but I quickly saw that inverting the pleats would make a much neater impression. The squared pattern was only roughly calculated, since it would be easy to add or remove pleats after positioning it on the cups. After making both smocked pieces, I draped them over the cups and after carefully pinning in place, hand sewed them on.


CONSTRUCTION (PART 2)
After covering the cups with the smocked fabric, I attached the cups to the inner layer of the corset.
The next step would finally show the outcome of my plan. I flipped over the outside layer and started hand attaching each seam to the structured underlayer. After doing some seams, I started to realise that this was not going as I had hoped. I paused and had a look how the already attached seams would look on my body and... it was disastrous. I was - to say the least- very displeased. The smooth, domelike look that I hoped to create was ruined by wrinkles. Wathever I tried (curving while sewing it on, more stretching the fabric, less stretching,...); it did not seem to make any difference.
This amount of wrinkling was unacceptable and it became clear to me that I would not present this corset.
Since it was already very close to the deadline, I did not see any way how I could fix this. There was no more time for completely disassembling the corset and starting over. I put away my hope of still entering the competition and went to sleep.


CONSTRUCTION (PART 3)
After a good night's sleep and several motivational messages, I was able to look at the project with a clearer mind.
I decided to redo all of the golden parts in the shell, this time with a fused to coutil. There would be topstitching necessary to flatten the seams, but by this time I was willing to accept this.
I changed my ironing board cover, gathered all of my courage and restarted: disasembling the whole thing, recutting all of the shell pieces, cutting coutil, fusing, restitching and opening the seam allowances, this time using topstitching.
The result: smooth flowing curves, taking shape by themselves and above all: unwrinkly! This was more how I like it.


PADDING THE RIBS
Fitting the new shell over the original base I discovered some minor flaws.
For one, there seemed to be a bit of space between the front rib curve of the shell and the inside, causing the shell to bend in a bit. Thinking of a quick fix - without having to open and widen the inner seam, I decided to use my wadding after all. I sewed on two layers of medium thick wadding, the second layer smaller than the first, allowing for a smooth transition. This quite unorthodox operation definitely contributed to the corset's strong, harness-like look.


 After adding the binding to the top and bottom of the corset, I moved on to the embellishments. Golden Swarovski pearls were handsewn on the corset: two strings of smaller pearls under the cup, and four strings of medium sized pearls emphasising the dome shapes at either side. The biggest pearls were used for some draped shoulder pieces. I added some attachments for removable transparant shoulder straps. The pearl shoulder pieces were also made removable and repositionable.
For the inside of the corset, I chose for a nightblue satin floating lining. The ivory satin laces were tipped off with golden lacing tips. The piece was finished off with rhinestones on the smocked cups, attached with E-6000 glue.


REFLECTIONS
This project was a challenge for me in many ways.
For the design, I tried to go out of my comfort zone, while staying true to my aesthetics.
Technically, Murphy seemed to be luring from behind every seam, so I had to improvise, adapt and retake many steps. Pushing your boundaries can be quite tricky when you're already lacking in time.
Nevertheless, I am very proud that I was able to finish this project. During the past year and a half, I put all of my efforts in opening my showroom, developping and producing commercial shapes and working on client commissions. Entering the competition made me rediscover some of my creativity. Having this new piece in my collection feels very rewarding and will serve me as a reminder not to lose creativity out of sight.
I feel very grateful towards all of the people that pushed me to go through, even though I had given up already. I would also like to thank my mother for her last-minute help with the pearls. A big shout-out to Lara and Kika for the wonderful pictures they made with the corset and even though I could not be present at the photoshoot, were willing to act upon my cryptic messages how to get the lacing to perfection. And a big thank you goes out to Foundations Revealed for still accepting my entry and pictures.
If you want to see more of my work, do visit my website, follow my Facebook page or Instagram.
For this year’s theme I looked for an architectural element that had an intrinsic link with corsetry. I found this link in the curves of the onion domes of Russian cathedrals.
I wanted to reflect the domes through the fabrics, shape and form of the corset. But more than a mere mimicry of the architectural form, the corset incorporates the strength and rulership of Catharine the Great. Through trial and error I explored the ballance between idea and realisation.
Although I tried to make this journal into a logical, step-by-step log, in reality steps were mixed up, retaken and improvised along the way.
Without further ado, I'm very proud to present to you the making of my Catherine Corset.
INSPIRATION
 As soon as this year's theme was anounced, I was set to find something out of the ordinary. Thinking about shapes and colours (and the fact that I would love to make a citytrip to Moscow one day), I stranded upon the Russian cathedrals and their onion shaped domes. Feeling that I had found my match, I needed to put these sentiments into a real, concrete form. Although the idea of using the curves of the domes and maybe combining them into a corset shape (see picture) came quite soon - I did not find a way how - and I put the whole project on hold.
Many months later, some weeks before the deadline, I realised I had to make something out of it, so I retook my research and examined more Russian domes. When I saw the domes of the chapel of the Catherine castle in Saint-Peterburg, I immediately felt in my element. The shiny golden surface combined with the linear, pearl shaped ornaments finally triggered my creativity. Reading about the lifes of Catherine I and Catherine the Great, I knew the corset would also serve very well to reflect female strength and power.


 I got out a golden synthetic leather I was saving for the right project. While my monochromatic self would have prefered to go completely golden, I wanted this project to take me out of my comfort zone. While I found a very interesting light blue pearlescent leatherette, the combination with the gold felt just too much. The blue fabric's sibling, a beautiful pearl ivory leatherette, seemed more subtle. After many sketches and miniature fabric testing (see picture), I settled with the gold-ivory color scheme and moved on to the patterning. Golden Swarovsky pearls would be used as referal to the architectural embellishments.
 As soon as this year's theme was anounced, I was set to find something out of the ordinary. Thinking about shapes and colours (and the fact that I would love to make a citytrip to Moscow one day), I stranded upon the Russian cathedrals and their onion shaped domes. Feeling that I had found my match, I needed to put these sentiments into a real, concrete form. Although the idea of using the curves of the domes and maybe combining them into a corset shape (see picture) came quite soon - I did not find a way how - and I put the whole project on hold.
Many months later, some weeks before the deadline, I realised I had to make something out of it, so I retook my research and examined more Russian domes. When I saw the domes of the chapel of the Catherine castle in Saint-Peterburg, I immediately felt in my element. The shiny golden surface combined with the linear, pearl shaped ornaments finally triggered my creativity. Reading about the lifes of Catherine I and Catherine the Great, I knew the corset would also serve very well to reflect female strength and power.


DESIGN + PATTERN
Since I was having a hard time getting my ideas on paper, I decided to start designing on the mannequin using the duct tape method. Since I am very proud of the standard corset shape I developed last year, I put this mock-up on my (carved and padded) mannequin and worked further on the existing shape. After a first attempt with 22 pattern pieces, I realised had to simplify some things.


Since I was having a hard time getting my ideas on paper, I decided to start designing on the mannequin using the duct tape method. Since I am very proud of the standard corset shape I developed last year, I put this mock-up on my (carved and padded) mannequin and worked further on the existing shape. After a first attempt with 22 pattern pieces, I realised had to simplify some things.


My second attempt consisted of much less pattern pieces and the mock-up seemed to work well on the mannequin. However, when I finally got to fit the piece, I realised that many things were not right yet: the white lines were quite off, the waist reduction was gone and I had completely miscalculated where the cups were supposed to stand.


After adjusting upper torso and cup position, I made a third, this time completely orange and busk-less mock-up. Since I would not have the time to make a fourth mock-up, I simulated the white parts with pattern paper - this way I could easily adjust them to a more esthetic shape. When I was finally happy with the basic shape, I transfered the shapes to a paper pattern. Since I was planning to work in two layers, I made two sets of patterns: one for the golden shell consisting of nine pattern pieces and one more simplified set for the inner strength layer.


Originally, I wanted to create the cups from scratch, with custom padding and everything. But since this proved more time consuming than foreseen and the contest-clock was ticking, I had to make some compromises. And since by this time I already decided to cover the cup with smocked fabric (see further), I ended up cutting up an existing bra.


Before I started with the construction of the corset I wanted to test out a little idea I had come up with during research. The onion domes of Saint Basil's in Moscow had gotten me fascinated with how each "slice" of the onion seemed to be tucked inward (especially on the white with blue dome). Planning to mimic this shape, I was going to add wadding to side hips and front ribs, and sew down each seam by hand,so a slight "puffed" effect would be reached. After several tests, it became clear to me that the fabric would ripple too much and also distort the subtle curved shapes I was able to create with my pattern. Maybe this idea will get a place in another project one day.


CONSTRUCTION (PART 1)
Although I had let go of my idea with the wadding, I still had certain specific requirements for the construction. Most importantly, I did not want ANY stitchings in the gold fabric. Since my prefered way of construction (one layer, often involving fusing), would mean visible stitches, I had to adept to this goal.
 What I came up with, was a two layered corset: an outer shell of gold and pearl white and a inner coutil corset, with double boning channels touching the body, to prevent any markings through the gold. Each seam of the outer layer would be handsewn on the underlayer to prevent rippling and provide for a clean, smooth finish. Since the outside shell consisted out of more and other seams than the inside layer, I provided the inside layer of markings where each outside seam was going to come, as a guideline where to sew down each seam. But with the turn-of-cloth in mind, I also realised that I would have to bend and hold the corset in the right shape when sewing down. As the stretchy golden layer would stay unfused, I was sure the stretch would also help for a smooth "wrap" around the inner corset. I could not have been more wrong (see below).


SMOCK
For this corset, I wanted to add something that would refer to my existing portfolio. I had been working with smocking technique on some projects already and I really enjoyed creating it. Smocking the golden leather would not only create a beautiful play of light, it would also add an interesting contrast to the smooth parts of the corset. At first I thought of making a flower smock, but I quickly saw that inverting the pleats would make a much neater impression. The squared pattern was only roughly calculated, since it would be easy to add or remove pleats after positioning it on the cups. After making both smocked pieces, I draped them over the cups and after carefully pinning in place, hand sewed them on.


CONSTRUCTION (PART 2)
The next step would finally show the outcome of my plan. I flipped over the outside layer and started hand attaching each seam to the structured underlayer. After doing some seams, I started to realise that this was not going as I had hoped. I paused and had a look how the already attached seams would look on my body and... it was disastrous. I was - to say the least- very displeased. The smooth, domelike look that I hoped to create was ruined by wrinkles. Wathever I tried (curving while sewing it on, more stretching the fabric, less stretching,...); it did not seem to make any difference.
This amount of wrinkling was unacceptable and it became clear to me that I would not present this corset.
Since it was already very close to the deadline, I did not see any way how I could fix this. There was no more time for completely disassembling the corset and starting over. I put away my hope of still entering the competition and went to sleep.


CONSTRUCTION (PART 3)
After a good night's sleep and several motivational messages, I was able to look at the project with a clearer mind.
I decided to redo all of the golden parts in the shell, this time with a fused to coutil. There would be topstitching necessary to flatten the seams, but by this time I was willing to accept this.
I changed my ironing board cover, gathered all of my courage and restarted: disasembling the whole thing, recutting all of the shell pieces, cutting coutil, fusing, restitching and opening the seam allowances, this time using topstitching.
The result: smooth flowing curves, taking shape by themselves and above all: unwrinkly! This was more how I like it.


PADDING THE RIBS
Fitting the new shell over the original base I discovered some minor flaws.
For one, there seemed to be a bit of space between the front rib curve of the shell and the inside, causing the shell to bend in a bit. Thinking of a quick fix - without having to open and widen the inner seam, I decided to use my wadding after all. I sewed on two layers of medium thick wadding, the second layer smaller than the first, allowing for a smooth transition. This quite unorthodox operation definitely contributed to the corset's strong, harness-like look.


FINISHINGS
At the center back, the outer layer was folded over the coutil and secured by stitching the center back boning channels. Golden eyelets were positioned and pressed in place, flanked by flat steel boning.
A golden modesty pannel was made, featuring 2 layers (one coutil, one coutil fused to the gold pleather), 4 flat synthetic bones and 8 golden eyelets.


 After adding the binding to the top and bottom of the corset, I moved on to the embellishments. Golden Swarovski pearls were handsewn on the corset: two strings of smaller pearls under the cup, and four strings of medium sized pearls emphasising the dome shapes at either side. The biggest pearls were used for some draped shoulder pieces. I added some attachments for removable transparant shoulder straps. The pearl shoulder pieces were also made removable and repositionable.
For the inside of the corset, I chose for a nightblue satin floating lining. The ivory satin laces were tipped off with golden lacing tips. The piece was finished off with rhinestones on the smocked cups, attached with E-6000 glue.


REFLECTIONS
This project was a challenge for me in many ways.
For the design, I tried to go out of my comfort zone, while staying true to my aesthetics.
Technically, Murphy seemed to be luring from behind every seam, so I had to improvise, adapt and retake many steps. Pushing your boundaries can be quite tricky when you're already lacking in time.
Nevertheless, I am very proud that I was able to finish this project. During the past year and a half, I put all of my efforts in opening my showroom, developping and producing commercial shapes and working on client commissions. Entering the competition made me rediscover some of my creativity. Having this new piece in my collection feels very rewarding and will serve me as a reminder not to lose creativity out of sight.
I feel very grateful towards all of the people that pushed me to go through, even though I had given up already. I would also like to thank my mother for her last-minute help with the pearls. A big shout-out to Lara and Kika for the wonderful pictures they made with the corset and even though I could not be present at the photoshoot, were willing to act upon my cryptic messages how to get the lacing to perfection. And a big thank you goes out to Foundations Revealed for still accepting my entry and pictures.
If you want to see more of my work, do visit my website, follow my Facebook page or Instagram.